
If you ever want to modify a named range because you’ve made a mistake or you want to assign a different cell to the variable, you can use the Name Manager. Go to the Formulas tab and select Name Manager.
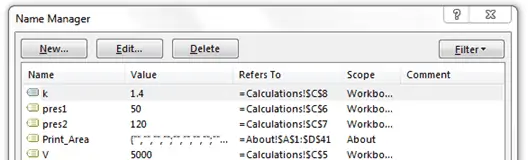
There you’ll see all the cells that have been assigned a name. The current value is displayed under “Value.” You can find the reference cell in the “Refers To” column. The Scope column tells you the scope of that named variable. A scope of “Workbook” indicates that it can be referenced on any worksheet in this workbook.
Click Edit to makes changes to the pres1 variable:
You can change the name or the reference cell easily from here. Change the name to P_1. Click OK, then close the Name Manager.
The cell’s name has now been updated in the name box:

Elevate Your Engineering With Excel
Advance in Excel with engineering-focused training that equips you with the skills to streamline projects and accelerate your career.
The formula has also been updated with the new variable name:
More Tips for Working with Named Cells
Excel also has features to make it easier to add names to variables and to apply those names to any formulas in the worksheet that are already written.
Rather than using the name box, you can create a column to hold the names of all your variables. Worksheet 03z contains the same data as the previous section, but using normal cell references to calculate the energy change. Right-click on column C and Insert a new column. In that column, enter the variable names to be applied: V, P_1, P_2, and k.
Next, select the cells containing both the names and the values. Go to the Formulas tab. In the Define Name section, choose Create From Selection.
Excel will make a guess as to which column contains the names. In this case, the left column contains the names:
Click OK. The names will be assigned to the four cells containing the values. This is a fast way to assign names to a batch of cells.
However, the formula still contains the old cell references (D5, D6, D7, D8). There’s an easy way to update the formula with the new names.
In the Defined Names section of the Formulas tab, click the small arrow next to Define Name:
Then choose Apply Names. In the window that pops up, the variables names are already select, so just click OK. The formula will be updated with the names you assigned:
These steps make it easy to assign names to several variables and update the workbook accordingly. This will make your formulas more readable and help you spot any errors.